If you own EOS or eosDAC ERC20 tokens, you need to register your Ethereum address with an EOS public address to receive the coins on the EOS network. This article will show you step by step how to register your coins.
Moving to the Mainnet
After a nearly year-long ICO, the EOS main net is finally ready to launch. The EOS token was originally created on the Ethereum blockchain to raise money for development, with the idea that the tokens would be transferable to the mainnet once it launches. The token contracts themselves are hard coded to stop working at a specific date and time. For EOS, the date is June 2, 2018, at 11:59 UTC. For eosDAC, it is June 1, 2018, at 11:59 UTC.
If you want to verify these times for yourself, you can check the contract code. For example, here’s the code for the eosDAC contract. You can find how that converts to your local time by using this website.
This guide will show you what you need to do to connect your EOS and eosDAC tokens to a valid EOS public address. When the EOS main net launches next month, the ERC20 tokens held in the registered Ethereum address will be credited on your EOS address.
Checking your Ethereum Address
The first thing you will need to do is check to see if your tokens are already registered. To check your tokens, copy the Ethereum address you originally had your EOS/eosDAC tokens sent to and search for it on any Ethereum block explorer (e.g. Etherscan). Check the “Tokens” drop-down menu to verify that this address has the EOS/eosDAC tokens. If you have tokens in multiple addresses, you’ll need to either move the tokens to a single address or register each Ethereum address.
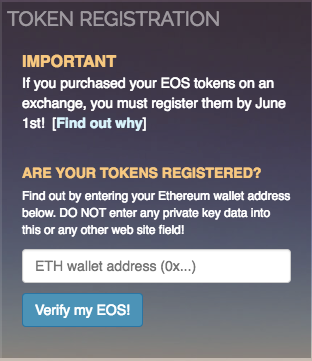
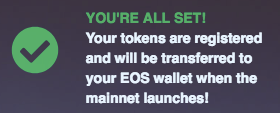
Once you have verified that your Ethereum address holds EOS/eosDAC tokens, go to the EOS countdown website and input your address in the Token Registration box on the left-hand side of the page. If your tokens are already registered, you’ll see a message like the one below. You can also see how much time you have left to register your tokens as well. Keep in mind that eosDAC tokens will be disabled a full day before the EOS tokens are disabled.
If your tokens are not yet registered, proceed to the next step.
Safely Generating EOS Keys
The easiest way to go about generating your EOS keys is to use the official EOS website, however, since the EOS ICO is closed to U.S. residents, if you are in the United States, you will have to use the alternative method.
EOS.io Method
- Go to EOS.io and scroll down to the EOS Token Distribution section
- Click the GET EOS button
- A Terms and Conditions box will appear – tick all the boxes and click the CONTINUE button
- You will be taken to https://eos.io/instructions – scroll down to the Participation Instructions section and click the REGISTER tab
- Select your preferred wallet and follow the instructions given
- Click the REGISTER EOS KEY button
- Be sure to save your EOS keys someplace safe – IMPORTANT!
- Copy your private key into the Confirm Private Key field
- Click the I HAVE SAFELY BACKED UP MY PRIVATE KEY button
- Follow the directions that appear next on the page
For a step by step visual guide of the EOS.io method, click here.
Alternate Method
If you know your way around GitHub and have a web server and PHP installed on your local machine, you can pull the code directly from GitHub, audit it, and run it yourself. You can view the changes made from the original code here. It is important to note that the code does not in any way pass any information into an external website or local storage on your machine. All it does is generate a key pair and display it. That’s it.
- Download the repo from GitHub
- Unzip the contents to a folder on your computer
- Open a terminal window (Command Prompt)
- Run the following code from the /docs folder you just downloaded:
php -S localhost:8000 - You should see this:

- Open your browser and type
localhost:8000in the address bar - You should see a screen that looks like this:

- Click the “Generate EOS key” link
- Be sure to save your EOS keys someplace safe – IMPORTANT!
Of course, if you’re a little less tech savvy, or you don’t have a web server installed on your local machine, and you trust GitHub to run the code displayed in the codebase, you can visit https://nadejde.github.io/eos-token-sale/ to generate your key. For added security, make sure to disconnect your computer from the internet before generating your keys.
As with the other methods, make sure you copy both your private and public keys and keep them in a safe place. You’ll need your public key to finish the registration process and you’ll need your private key when it comes time to actually use the EOS main net.
Registering your EOS Address (Public Key)
Once you’ve safely backed up your keys, its time to register your EOS address (public key). You will need to do this for all Ethereum addresses that have an EOS/eosDAC token balance. What you’ll be doing is running whats called the “register” method on the EOS Ethereum contract called “EOS Contribution.” This sound very complicated, but MyEtherWallet (MEW) provides a very easy way to do it.
If you have Ethereum stored on MEW, a Ledger Nano S, or Trezor, you can use the MEW interface to register your coins. If you have tokens stored on a different wallet, you’ll need to import the private key into MEW, or create a new MEW wallet and move the coins to that address.
- Once you’ve opened up MEW, go to the CONTRACTS tab
- Look for “EOS: Contribution” in the SELECT EXISTING CONTRACT drop-down menu and click on it
- Click the ACCESS button below the ABI / JSON Interface box
- In the Read / Write Contract section, select “register” from the SELECT A FUNCTION drop-down menu
- Paste your EOS address (public key) in the “Key String” text box
- You’ll be prompted to connect your wallet to MEW, and once you’re unlocked hit the WRITE button
- You won’t need to change the suggested gas limit, but make sure you have a bit of Ether in your wallet to cover the cost of the transaction
- Hit GENERATE TRANSACTION and you’ll be given a link to your transaction to view it on the block explorer – depending on network congestion, it may take some time to show up on the blockchain
That’s All There Is To It!
Remember – June 1st is only a few days away, so don’t put this off!
For our readers who store EOS or eosDAC on an exchange, remember the saying, “Not your keys, not your Bitcoins!” – or in this case, EOS. The best thing to do is to safely store your tokens in a personal wallet and register them yourself.
What do you think about the upcoming mainnet launch? Are you an EOS token holder? Let us know in the comments below!
Images courtesy of MyEtherWallet, EOScountdown, Shutterstock


